共计 9946 个字符,预计需要花费 25 分钟才能阅读完成。
系统:CentOS最小化安装;升级软件补丁,内核和系统版本不升级;关闭SELinux和防火墙。
软件:安装包统一放置在/usr/src目录下,安装位置统一在/usr/local目录下。
环境:LNMP环境事先安装部署好;本次环境采用的是LNMP1.5一键安装包(lnmp.org)部署的环境。
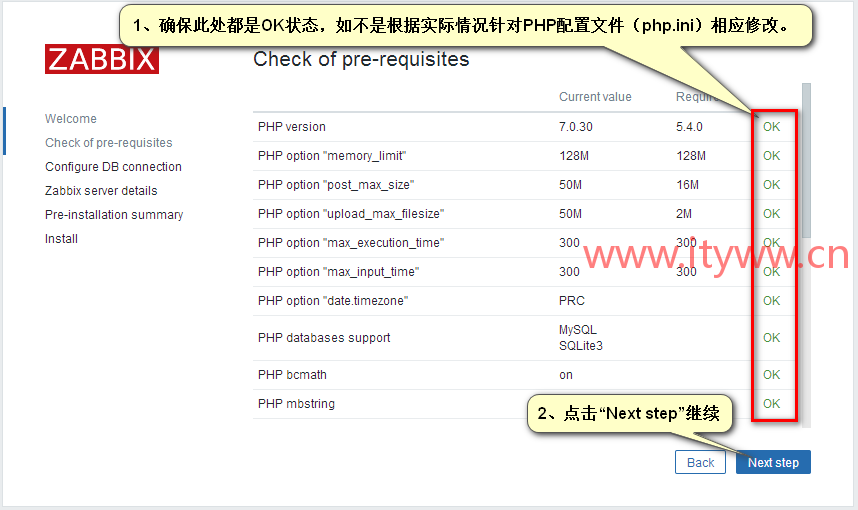
1、Zabbix程序会使用到PHP的LDAP功能,因此需要针对PHP安装LDAP扩展,安装请参考以下文章[neilian ids=1168]2、查验并配置Zabbix所需的PHP参数(/usr/local/php/etc/php.ini):
max_execution_time = 300
memory_limit = 128M
post_max_size = 16M
upload_max_filesize = 2M
max_input_time = 300
date.timezone = PRC
[v_blue]只能大于或等于以上参数,不能小于以上参数。[/v_blue]
1、安装依赖库:yum -y install net-snmp-devel libxml2-devel libcurl-deve
[root@localhost ~]# yum -y install net-snmp-devel libxml2-devel libcurl-deve
Loaded plugins: fastestmirror
Loading mirror speeds from cached hostfile
 * base: mirrors.aliyun.com
 * extras: mirrors.aliyun.com
 * updates: mirrors.aliyun.com
base                                                                                                                                                          | 3.6 kB  00:00:00
extras                                                                                                                                                        | 3.4 kB  00:00:00
updates                                                                                                                                                       | 3.4 kB  00:00:00
Package libxml2-devel-2.9.1-6.el7_2.3.x86_64 already installed and latest version
No package libcurl-deve available.
Resolving Dependencies
--> Running transaction check
---> Package net-snmp-devel.x86_64 1:5.7.2-33.el7_5.2 will be installed
--> Processing Dependency: net-snmp-libs = 1:5.7.2-33.el7_5.2 for package: 1:net-snmp-devel-5.7.2-33.el7_5.2.x86_64
......此处省略......
---> Package pyparsing.noarch 0:1.5.6-9.el7 will be installed
--> Finished Dependency Resolution

Dependencies Resolved

=====================================================================================================================================================================================
 Package                                           Arch                             Version                                                  Repository                         Size
=====================================================================================================================================================================================
Installing:
 net-snmp-devel                                    x86_64                           1:5.7.2-33.el7_5.2                                       updates                           250 k
......此处省略......
 systemtap-sdt-devel                               x86_64                           3.2-4.el7                                                base                               72 k
 tcp_wrappers-devel                                x86_64                           7.6-77.el7                                               base                               17 k

Transaction Summary
=====================================================================================================================================================================================
Install  1 Package (+20 Dependent packages)

Total download size: 4.2 M
Installed size: 15 M
Downloading packages:
(1/21): elfutils-libelf-devel-0.170-4.el7.x86_64.rpm                                                                                                          |  38 kB  00:00:00
(2/21): elfutils-devel-0.170-4.el7.x86_64.rpm                                                                                                                 |  84 kB  00:00:00
......此处省略......
(20/21): perl-devel-5.16.3-292.el7.x86_64.rpm                                                                                                                 | 453 kB  00:00:00
(21/21): tcp_wrappers-devel-7.6-77.el7.x86_64.rpm                                                                                                             |  17 kB  00:00:00
-------------------------------------------------------------------------------------------------------------------------------------------------------------------------------------
Total                                                                                                                                                2.3 MB/s | 4.2 MB  00:00:01
Running transaction check
Running transaction test
Transaction test succeeded
Running transaction
  Installing : 1:net-snmp-libs-5.7.2-33.el7_5.2.x86_64                                                                                                                          1/21
  Installing : lm_sensors-libs-3.4.0-4.20160601gitf9185e5.el7.x86_64                                                                                                            2/21
......此处省略......
  Verifying  : elfutils-libelf-devel-0.170-4.el7.x86_64                                                                                                                        20/21
  Verifying  : perl-ExtUtils-MakeMaker-6.68-3.el7.noarch                                                                                                                       21/21

Installed:
  net-snmp-devel.x86_64 1:5.7.2-33.el7_5.2

Dependency Installed:
  elfutils-devel.x86_64 0:0.170-4.el7                 elfutils-libelf-devel.x86_64 0:0.170-4.el7                      gdbm-devel.x86_64 0:1.10-8.el7
  libdb-devel.x86_64 0:5.3.21-24.el7                  lm_sensors-devel.x86_64 0:3.4.0-4.20160601gitf9185e5.el7        lm_sensors-libs.x86_64 0:3.4.0-4.20160601gitf9185e5.el7
  mariadb-libs.x86_64 1:5.5.56-2.el7                  net-snmp.x86_64 1:5.7.2-33.el7_5.2                              net-snmp-agent-libs.x86_64 1:5.7.2-33.el7_5.2
  net-snmp-libs.x86_64 1:5.7.2-33.el7_5.2             perl-ExtUtils-Install.noarch 0:1.58-292.el7                     perl-ExtUtils-MakeMaker.noarch 0:6.68-3.el7
  perl-ExtUtils-Manifest.noarch 0:1.61-244.el7        perl-ExtUtils-ParseXS.noarch 1:3.18-3.el7                       perl-devel.x86_64 4:5.16.3-292.el7
  popt-devel.x86_64 0:1.13-16.el7                     pyparsing.noarch 0:1.5.6-9.el7                                  rpm-devel.x86_64 0:4.11.3-32.el7
  systemtap-sdt-devel.x86_64 0:3.2-4.el7              tcp_wrappers-devel.x86_64 0:7.6-77.el7

Complete!
2、在Zabbix源码目录内预编译软件:./configure –prefix=/usr/local/zabbix –enable-server –enable-agent –with-mysql=/usr/local/mysql/bin/mysql_config –enable-ipv6 –with-net-snmp –with-libcurl –with-libxml2
[root@localhost zabbix-3.0.18]# ./configure --prefix=/usr/local/zabbix --enable-server --enable-agent --with-mysql=/usr/local/mysql/bin/mysql_config --enable-ipv6 --with-net-snmp --with-libcurl --with-libxml2
checking for a BSD-compatible install... /usr/bin/install -c
checking whether build environment is sane... yes
......此处省略......
config.status: creating include/config.h
config.status: executing depfiles commands


Configuration:

  Detected OS:           linux-gnu
  Install path:          /usr/local/zabbix
  Compilation arch:      linux

  Compiler:              gcc
  Compiler flags:         -g -O2

  Library-specific flags:
    database:               -I/usr/local/mysql/include   -g -fabi-version=2 -fno-omit-frame-pointer -fno-strict-aliasing
    libXML2:               -I/usr/include/libxml2
    Net-SNMP:               -I/usr/local/include -I/usr/lib64/perl5/CORE -I. -I/usr/include

  Enable server:         yes
  Server details:
    With database:         MySQL
    WEB Monitoring:        cURL
    Native Jabber:         no
    SNMP:                  yes
    IPMI:                  no
    SSH:                   no
    TLS:                   no
    ODBC:                  no
    Linker flags:             -L/usr/local/mysql/lib        -L/usr/lib64      -rdynamic
    Libraries:               -lmysqlclient  -lpthread -lm -ldl     -lxml2    -lnetsnmp      -lcurl -lm -ldl  -lresolv -liconv

  Enable proxy:          no

  Enable agent:          yes
  Agent details:
    TLS:                   no
    Linker flags:              -rdynamic
    Libraries:                 -lcurl -lm -ldl  -lresolv -liconv

  Enable Java gateway:   no

  LDAP support:          no
  IPv6 support:          yes

***********************************************************
*            Now run 'make install'                       *
*                                                         *
*            Thank you for using Zabbix!                  *
*                                  *
***********************************************************
3、编译安装:make && make install
[root@localhost zabbix-3.0.18]# make && make install
Making all in src
make[1]: Entering directory `/usr/src/zabbix-3.0.18/src'
Making all in libs
make[2]: Entering directory `/usr/src/zabbix-3.0.18/src/libs'
Making all in zbxcrypto
......此处省略......
make[2]: Nothing to be done for `install-data-am'.
make[2]: Leaving directory `/usr/src/zabbix-3.0.18/upgrades'
make[1]: Leaving directory `/usr/src/zabbix-3.0.18/upgrades'
make[1]: Entering directory `/usr/src/zabbix-3.0.18'
make[2]: Entering directory `/usr/src/zabbix-3.0.18'
make[2]: Nothing to be done for `install-exec-am'.
make[2]: Nothing to be done for `install-data-am'.
make[2]: Leaving directory `/usr/src/zabbix-3.0.18'
make[1]: Leaving directory `/usr/src/zabbix-3.0.18'
4、创建zabbix用户和组(用户属性为禁止登录及不创建家目录):useradd -s /sbin/nologin -M zabbix
[root@localhost zabbix-3.0.18]# useradd -s /sbin/nologin -M zabbix5、配置Zabbix数据库
mysql -uroot -p
Enter password:
mysql> create database zabbix default charset utf8;
mysql> grant all on zabbix.* to zabbix@’localhost’ identified by ‘zabbix’;
mysql> flush privileges;
mysql> use zabbix;
mysql> source /usr/src/zabbix-3.0.18/database/mysql/schema.sql;
mysql> source /usr/src/zabbix-3.0.18/database/mysql/images.sql;
mysql> source /usr/src/zabbix-3.0.18/database/mysql/data.sql;
mysql> quit
[root@localhost zabbix-3.0.18]# mysql -uroot -p
Enter password:
Welcome to the MySQL monitor.  Commands end with ; or \g.
Your MySQL connection id is 1
Server version: 5.6.40-log Source distribution

Copyright (c) 2000, 2018, Oracle and/or its affiliates. All rights reserved.

Oracle is a registered trademark of Oracle Corporation and/or its
affiliates. Other names may be trademarks of their respective
owners.

Type 'help;' or '\h' for help. Type '\c' to clear the current input statement.

mysql> create database zabbix default charset utf8;
Query OK, 1 row affected (0.00 sec)

mysql> grant all on zabbix.* to zabbix@'localhost' identified by 'zabbix';
Query OK, 0 rows affected (0.00 sec)

mysql> flush privileges;
Query OK, 0 rows affected (0.00 sec)

mysql> use zabbix;
Database changed
mysql> source /usr/src/zabbix-3.0.18/database/mysql/schema.sql;
Query OK, 0 rows affected (0.31 sec)

Query OK, 0 rows affected (0.22 sec)
Records: 0  Duplicates: 0  Warnings: 0
......此处省略......
Query OK, 0 rows affected (0.51 sec)
Records: 0  Duplicates: 0  Warnings: 0

Query OK, 0 rows affected (0.46 sec)
Records: 0  Duplicates: 0  Warnings: 0

mysql> source /usr/src/zabbix-3.0.18/database/mysql/images.sql;
Query OK, 1 row affected (0.06 sec)

Query OK, 1 row affected (0.04 sec)
......此处省略......
Query OK, 1 row affected (0.05 sec)

Query OK, 1 row affected (0.03 sec)

mysql> source /usr/src/zabbix-3.0.18/database/mysql/data.sql;
Query OK, 0 rows affected (0.00 sec)

Query OK, 1 row affected (0.00 sec)
......此处省略......
Query OK, 1 row affected (0.00 sec)

Query OK, 0 rows affected (0.06 sec)

mysql> quit
Bye
6、配置zabbix服务端:/usr/local/zabbix/etc/zabbix_server.conf
DBHost=localhost #默认是localhost;保持默认即可
DBName=zabbix #默认是zabbix;如不同可根据实际情况相应修改
DBUser=zabbix #默认是zabbix;如不同可根据实际情况相应修改
DBPassword=zabbix #默认没有密码;根据实际情况相应配置
DBSocket=/tmp/mysql.sock #指定MySQL的Sock文件路径
7、配置zabbix客户端:/usr/local/zabbix/etc/zabbix_agentd.conf
Server=127.0.0.1 #客户端于服务端处于一起保持默认即可,反之则配置远端Zabbix服务端IP地址。
ServerActive=127.0.0.1 #客户端于服务端处于一起保持默认即可,反之则配置远端Zabbix服务端IP地址。
8、拷贝Zabbix服务端启动文件和客户端启动文件
[root@localhost zabbix-3.0.18]# cp /usr/src/zabbix-3.0.18/misc/init.d/fedora/core/zabbix_server /etc/rc.d/init.d/zabbix_server
[root@localhost zabbix-3.0.18]# cp /usr/src/zabbix-3.0.18/misc/init.d/fedora/core/zabbix_agentd /etc/rc.d/init.d/zabbix_agentd
9、编辑服务端启动文件(/etc/rc.d/init.d/zabbix_server)和客户端启动文件(/etc/rc.d/init.d/zabbix_agentd);根据实际情况配置指定Zabbix安装目录路径参数“BASEDIR=/usr/local/zabbix/”
10、添加执行权限:chmod +x /etc/rc.d/init.d/zabbix_server && chmod +x /etc/rc.d/init.d/zabbix_agentd
[root@localhost zabbix-3.0.18]# chmod +x /etc/rc.d/init.d/zabbix_server && chmod +x /etc/rc.d/init.d/zabbix_agentd11、添加开机启动:chkconfig zabbix_server on && chkconfig zabbix_agentd on
[root@localhost zabbix-3.0.18]# chkconfig zabbix_server on && chkconfig zabbix_agentd on12、启动Zabbix服务端和客户端:systemctl start zabbix_server && systemctl start zabbix_agentd
[root@localhost zabbix-3.0.18]# systemctl start zabbix_server && systemctl start zabbix_agentd[root@VM_196_177_centos zabbix-3.0.18]# ss -lnat
State Recv-Q Send-Q Local Address:Port Peer Address:Port
LISTEN 0 128 *:80 *:*
LISTEN 0 128 *:7512 *:*
LISTEN 0 128 *:10050 *:*
LISTEN 0 128 *:10051 *:*
ESTAB 0 0 10.105.196.177:80 112.87.237.203:52705
ESTAB 0 0 10.105.196.177:7512 112.87.237.203:49217
TIME-WAIT 0 0 127.0.0.1:10051 127.0.0.1:40658
ESTAB 0 0 10.105.196.177:80 112.87.237.203:53505
ESTAB 0 0 10.105.196.177:80 112.87.237.203:51777
ESTAB 0 0 10.105.196.177:44202 10.249.118.39:5574
LISTEN 0 128 :::10050 :::*
LISTEN 0 128 :::10051 :::*
LISTEN 0 128 :::3306 :::*13、Nginx配置好Zabbix的站点后拷贝Zabbix的WEB应用程序至网站根目录并授权:
[root@localhost zabbix-3.0.18]# cp -r /usr/src/zabbix-3.0.18/frontends/php/* /home/wwwroot/zabbix.smartac.co/
[root@localhost zabbix-3.0.18]# chown -R www.www /home/wwwroot/zabbix.smartac.co/
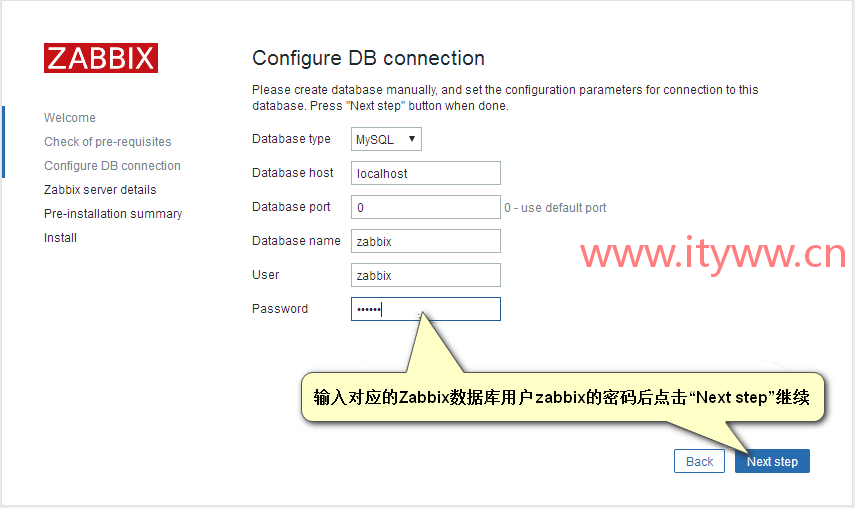
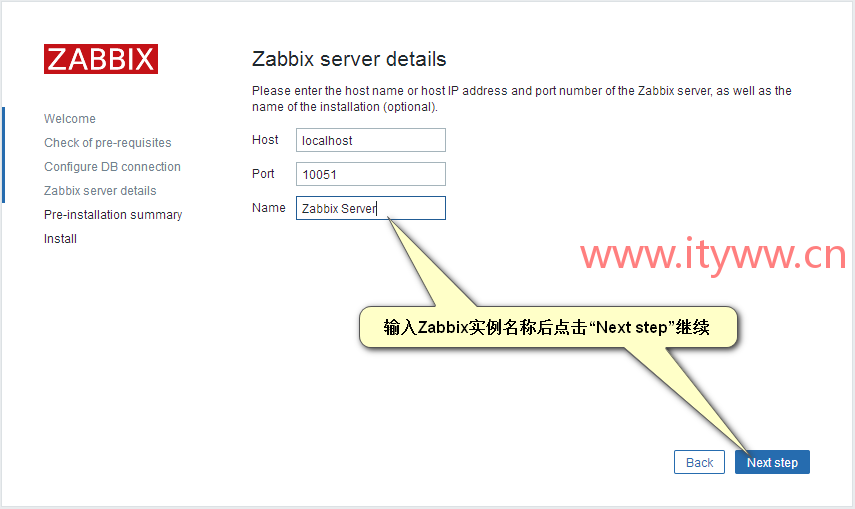
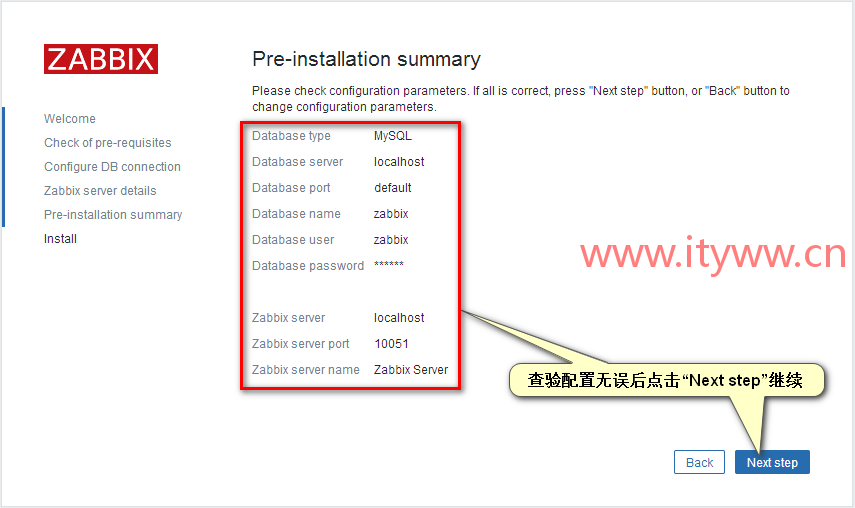
14、浏览器输入Zabbix站点地址配置WEB(如站点地址为IP地址则直接输入IP地址即可)

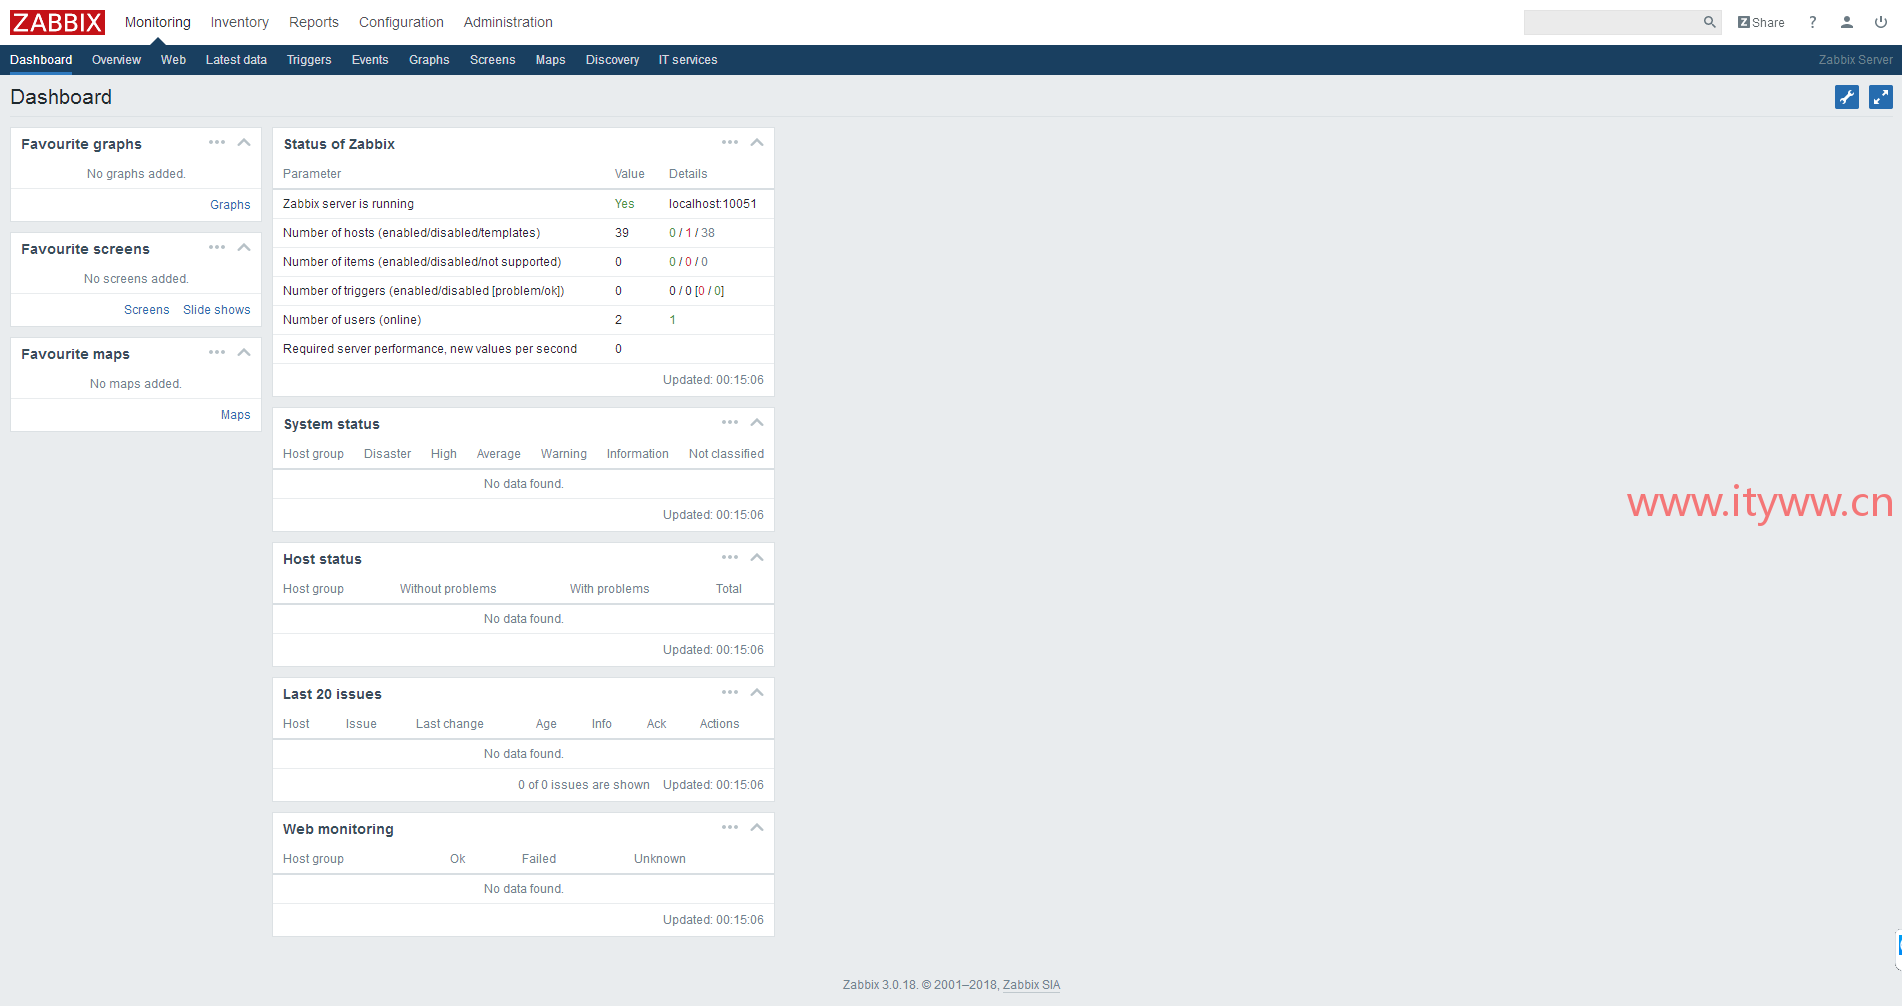
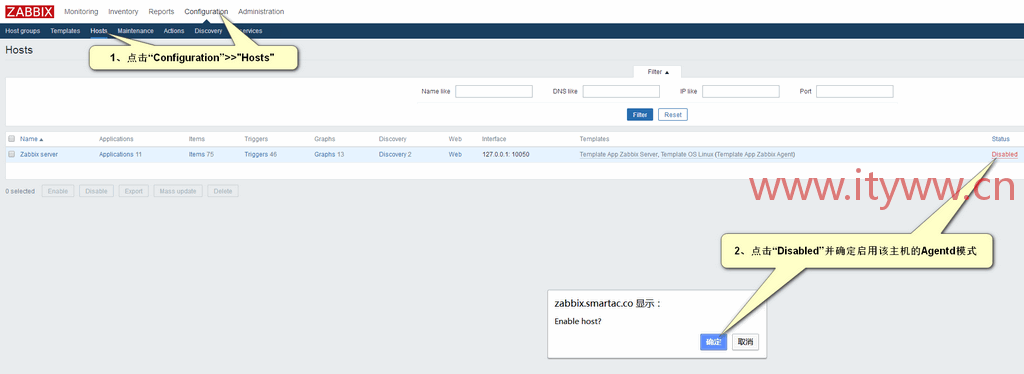
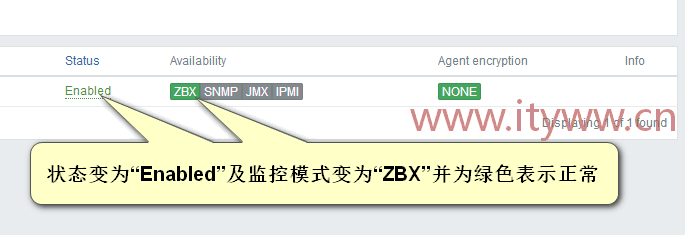
12、默认Zabbix Server主机的Agentd模式没有启用,此时只有Server模式的监控,我们需要把Agentd模式启用。
